Consignments
A consignment in Cargonizer is a transport assignment carried out by a carrier that you select as a Shipping Agent in Business Central.
To order transport for the items on your sales orders you need to create a consignment describing what should be transported, from where and to where among other things. This consignment is then sent to the carrier to order the transport.
Cargonizer Connector does a lot of the work for you by filling out many of and sometimes all the details on the consignment.
Creating a Consignment
You can create consignments either manually or automatically when you ship a Sales Order. To create a consignment manually follow the guide below.
To create consignments automatically look at the section called Automatically Send Consignments when Shipping Sales Orders on the setup page.
Creating Consignments Manually
In Dynamics 365 Business Central, open the sales order for which you would like to create a consignment.
Under the heading Shipping and Billing, in the Agent field, select a shipping agent (this corresponds to a Transport Agreement in Cargonzier).
If you have more than one Cargonizer Sender IDs specified then make sure that you select the correct Shipping Agent based on the Sender ID you would like to use.
Only Shipping Agents that have a value in the Cargonzier Sender ID field can be used with Cargonizer Connector.
In the Agent Service field, select an agent service (this corresponds to a product in Cargonizer).
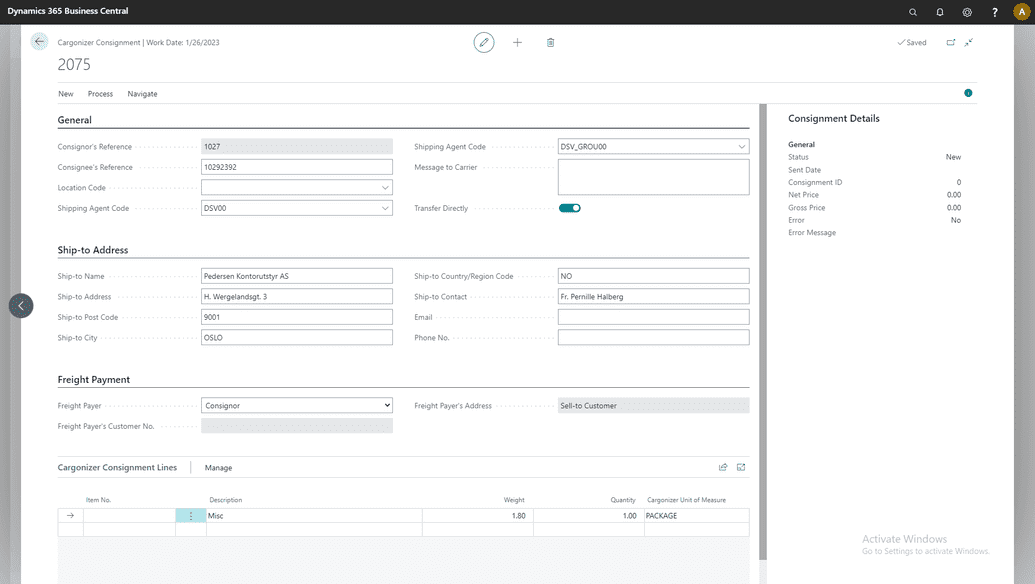
On the ribbon at the top of the page, select Actions > Cargonizer Consignment. A new page showing the consignment will pop up.
Add a reference for the recipient and/or a message for the carrier in the corresponding fields.
Select who should pay for the freight.If applicable fill out the field Freight Payer's Customer No. and verify that the Freight payer's Address is correct.
Look under Cargonizer Consignment Lines and make sure the fields Weight, Quantity and Cargonizer Unit of Measure for each line is filled out correctly.
If you would like to edit the consignment further in Cargonizer before it is sent to the carrier, then make sure that the field Transfer Directly is not checked.
- This can be relevant if you would like to select a service provided by the carrier which has not yet been implemented in Cargonizer Connector.
Get a Price Estimate
For the carriers that support it you can get a price estimate for the delivery before sending the consignment.
- Click on Process on the ribbon at the top of the page and the click on Get Estimated Price.
- Once complete the price should be visible at the bottom of the page under Consignment Details. (You may have to fold out the group if you don't see any fields).
Sending the Consignment
- On the ribbon at the top of the page click on Process then click on Send Consignment. Your consignment has now been sent.
Editing the Consignment in Cargonizer
If the field Transfer Directly was not checked when you sent the consignment you will have to log into Cargonizer where can edit the consignment further before sending it to the carrier from there.
- Click on Navigate on the ribbon at the top of the page and then click on Open in Cargonizer.
Download Waybills and Labels
Once you have sent a consignment, you can download a waybill and/or labels.
- Select Download Waybill and/or Download Labels on the ribbon under Processing. A PDF file will be downloaded to your device.
Printing the Waybill and Labels
Waybill
Once you have downloaded the waybill to your computer (see the section above) you can print it out as you would any other document.
Labels
Using DirectPrint
Logistra sells a solution consisting of a label printer and a dongle called DirectPrint. This solution requires no setup other than connecting the printer through the dongle to your local network (must be a wired connection) and allows you to easily print your labels directly from Business Central.
- To print the labels using DirectPrint simply click on Process on the ribbon at the top of the page and then click on Print Labels (DirectPrint).
- Select the printer on which you would like to print the labels from the list that shows up.
Without DirectPrint
- If you are not using the DirectPrint solution you can download the labels as a PDF to your computer (See section above) and print them out as you would print out any other document.
Track the Shipment
Once you have sent an order, you can keep track of your shipment.
- On the ribbon, select Navigate and then Track Shipment. A new tab will open in your browser and display the tracking information on the carrier's website.
Overview over Consignments
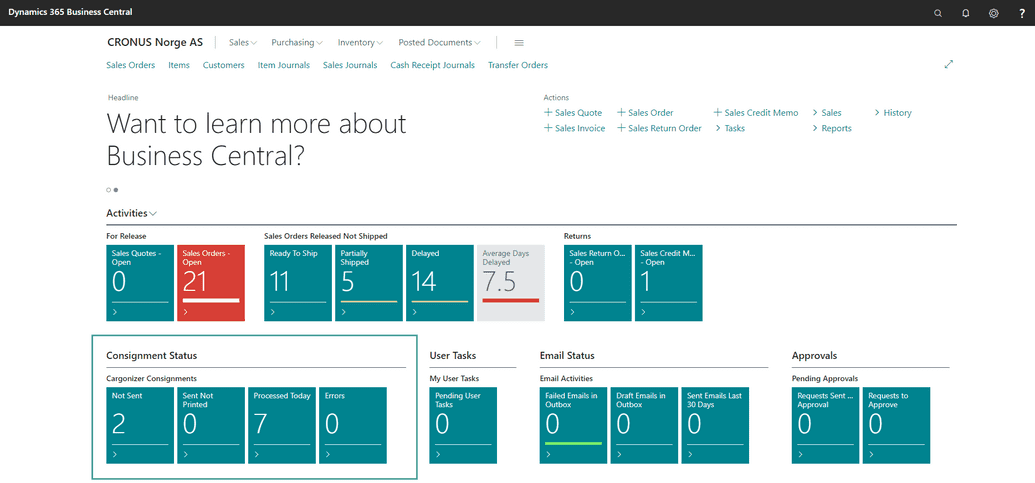
If you have the Order Processor role in Business Central you can see an overview of the Consignments in the system and their status.
Not Sent
These are consignments that have been created but not sent over to Cargonizer or the Carrier.
Sent Not Printed
Shows consignments which have been sent to Cargonizer/the carrier but for which the labels have not been printed.
Processed Today
Shows consignments that have been sent and printed today.
Error
Shows consignments for which an error has occurred. If you click on it you will see the cause of the error, fix it and process it again.

